Users
1. Users Index
This interface lists all users belonging to you and to your sub-managers. Some table columns are not visible by default. You can set which columns to show or hide using the list-icon located on the top-right of the table.
2. Users Status
On top of the interface, there are 4 coloured squares showing connection status:

GREEN (Active) : The user is enabled and active, but not online at the moment.
BLUE (Online): The user is online (connected).
ORANGE (Expired) : The user is expired, or consumed his traffic quota.
RED (Disabled) : The user is disabled by the manager.
BLACK (Zombie) : Zombie user, which is a user reported online by NAS, but it does not exist in radius database.
3. Users Actions
Actions tab includes tasks associated with users such as:
- Live Traffic: Shows live data usage graph for the user.
- Deposit: Adds amount of money into user’s account.
- Withdrawal: Deducts money from user’s account.
- Extend Service: Extends user’s service by days or traffic, depending on the select extension.
- Change Profile: Change service for selected username, you must select the new profile and must important is.
- When to Change: option for expire user it will show (Immediate) option only but for online users it will show (Immediate, On Next Expiration) that's mean whenever user is expire it will automatically switch to new profile.
- Cancel Service: Cancels user subscription and refunds any remaining amount to his parent manager.
4. Creating User
To create a user, click Actions tab in the User interface, then select New. Empty User Form will show up for submission. Bellow, explanation of each field:
-
Basic information
- Username: the login name by which the user will dial-up from PPPoE,Hotspot,...etc. A MAC address can be used as a username in some cases.
- Password: the login password to be used for dial-up. If no password is provided, the system will use the username as a password.
- Enabled: Enable/disable user login.
- Service Profile: The service profile associated with the user, refer to Profiles for more information.
- Parent: The owner of this user. Each user must belong to a manager. By default, the user belongs to the manager who creates it.
- Site: If sites are enabled for your license, then you get to choose on which site the user will be available. Users belonging to specific sites won’t be able to connect from other sites.
- MAC Lock: When enabled, the user will only be able to log in from devices listed by MAC in the Allowed MACs list.
-
Personal Information: We will skip explaining these fields since they are self explanatory.
- Advanced Details
- Expiration: User expiration, this field can be edited only by the system administrator.
- Simultaneous Sessions: Number of concurrent sessions per user, default is 1.
- Static IP Address: When set, the user will get a static IP address assigned to it.
- Mikrotik Winbox Group: SAS4 can be used as a login controller for Mikrotik winbox. This can be configured from Winbox Systems->Users to accept users via Radius. In this field, you can set the default that all logins would use. This feature is useful when you have a large number of Mikrotik routers and you want a centralized way to manage who can access them.
- Mikrotik Framed Route: In this field, you can add static routes to be added for this user when he/she logs in.
- Mikrotik Address List: Set Mikrotik address list name which will be created and added automatically each time this user logs in.
- IPv6 Prefix: dedicated prefix to be added for this user.
- Auto-Renew: When enabled, SAS will try to automatically renew this user if it has enough credit.
- User Type: There are two types of users in SAS4, regular users which are the normal users for PPP & hotspot connections, and Wireless Client users, wireless clients are defined by MAC addresses of their wireless card. This is useful to authenticate wireless clients to hotspot networks not implemented yet.
5. Activating User
When a user is created, it requires to activate or purchase a service, as long as the associated profile has expiration/traffic limits. To activate a user simply right click or select the user then select ‘Activate’. You will be redirected to the activation page which shows cost and profile attributes. Activation is a pay service and it can be funded from three different sources:
- Manager’s Balance: The activation cost will be deducted from the logged-in manager balance (if available).
- Prepaid Card: Using a prepaid card generated by the system. The value of the card has to match the activation cost or higher.
- User’s Balance: the amount required will be deducted from the user balance if available.
6. Deleting User
To delete user(s), select user(s) from the user's list page and click on Delete from the actions menu. Note that deletion will fail if the user still has balance in his/her account. It is worth mentioning that the system will not delete the user records from the database, instead, it will be renamed to some random string and becomes hidden.
7. Rename User
It is easy to rename users from the users list. Select a user or right-click it then select ‘Rename’. The rename dialog will show up. The rename may fail if the new username is already used.
8. Changing Service Profile
To change the user profile, select the user and from actions click on “Change Profile”. You will be redirected to profile change dialogue, where you can choose the new profile for the selected user. If the user is expired, the change will happen immediately. If the user is active, the change will take place on the next billing period (when the user account is expired).
9. User Edit
- User Form: Includes multiple tabs that are administered by managers to run financial transactions using Invoices & Payments tabs,monitor traffic and sessions and edit other user details.
- User Edit: this tab shows the user edit form, which is identical to the user creation form. It allows you to edit most of the user details. Some attributes come as read-only and can not be edited unless the manager has the right permissions.
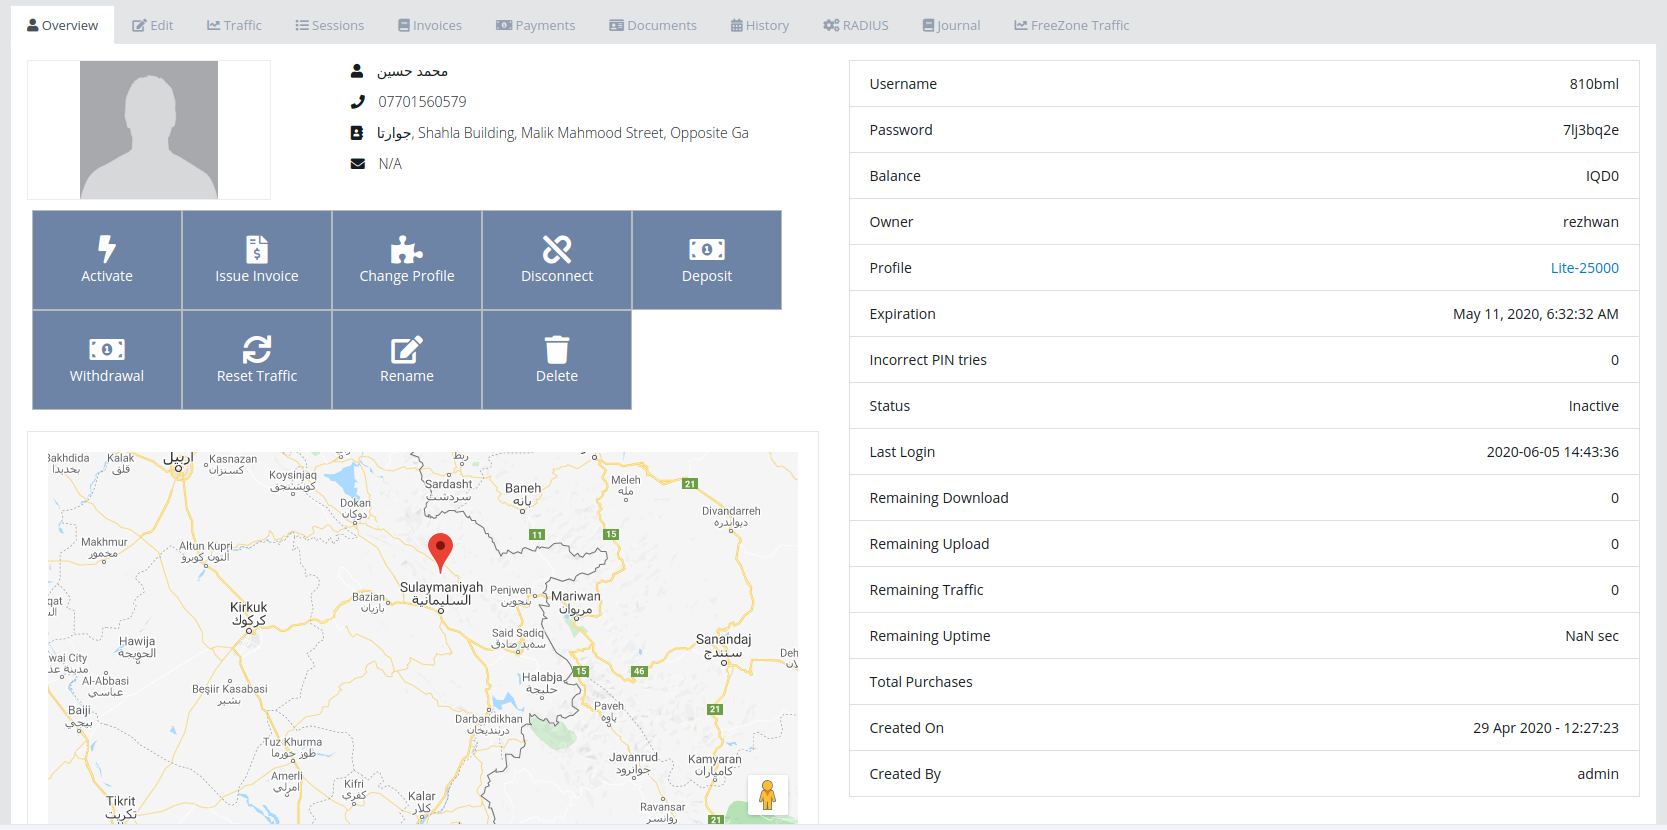
- User Overview Interface: The overview interface provides a 360° view for the user account details. Tabs show basic user information similar to that included on ‘Users table’ It is also possible to set the user location on the map from the overview page. To do so, simply drag and drop the red placemark, and the location will get updated, or add user Longitude and Altitude beneath the map manually.
10. Online Users
Users / Online Interface is similar to Users Table with tasks associated with at the moment connected users.

GREEN (Active) : The user is enabled and active, but not online at the moment.
PURPLE (FUP - Fair Usage Policy): Users exceed the data limit.
ORANGE (Expired) : The user is expired, or consumed his traffic quota.
RED (Disabled) : The user is disabled by the manager.
BLACK (Zombie) : Zombie user, which is a user reported online by NAS, but it does not exist in radius database.
11. Online Users Actions
- Live traffic: displays current download/upload rate for the user.
- Overview: you can review section 6.1.1 for more details.
- Edit: check section 6.1.2 for more details.
- Disconnect: disconnects user from NAS.
- Lock MAC: enable/disable MAC lock for the user.
- PING: send PING packets to the user IP address.